All posts by chris

Learning to Solder – Part 2

Newspapers were used since they quickly smoke/smell if a soldering iron is left on the table. The chaser kits are sometimes called a Larson Scanner referring to Battlestar Galactica & Knight Rider.
The chaser kits being built are sometimes called a Larson Scanner referring to Battlestar Galactica & Knight Rider.

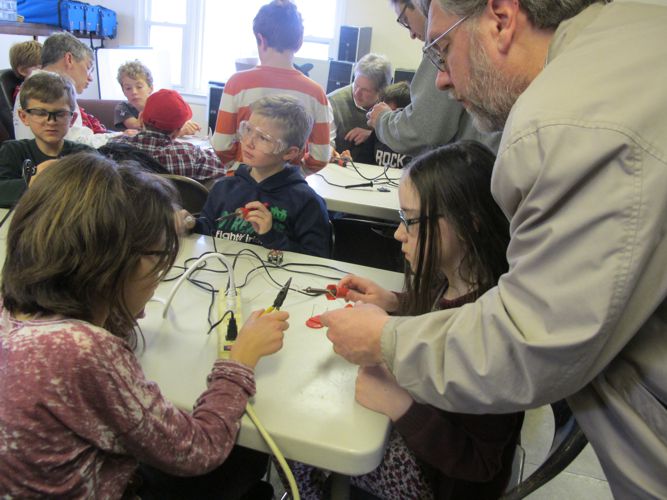
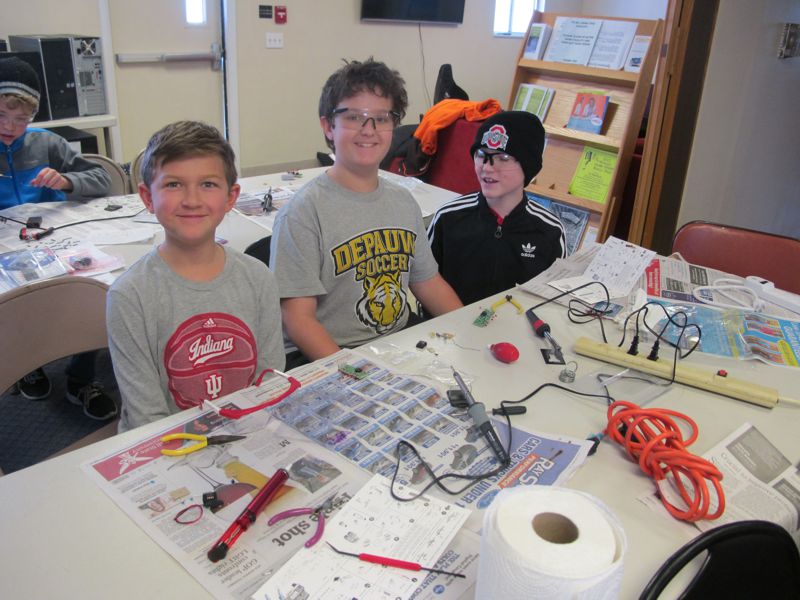
Despite the snow & cupid competition, we had some not-so-lonely hearts show up yesterday to continue learning and honing their soldering skills. This was our 2nd soldering session, during the first one the kids learned first by soldering wires together and then went on the kits. A little simpler kit with color changing/blinking lights was used this time for those that missed the first meeting or were quick to finish.

Newspapers were used to quickly smoke/smell if a soldering iron is on the table.
Newspapers were used on the tables, they quickly smoke/smell if a soldering iron is on them.

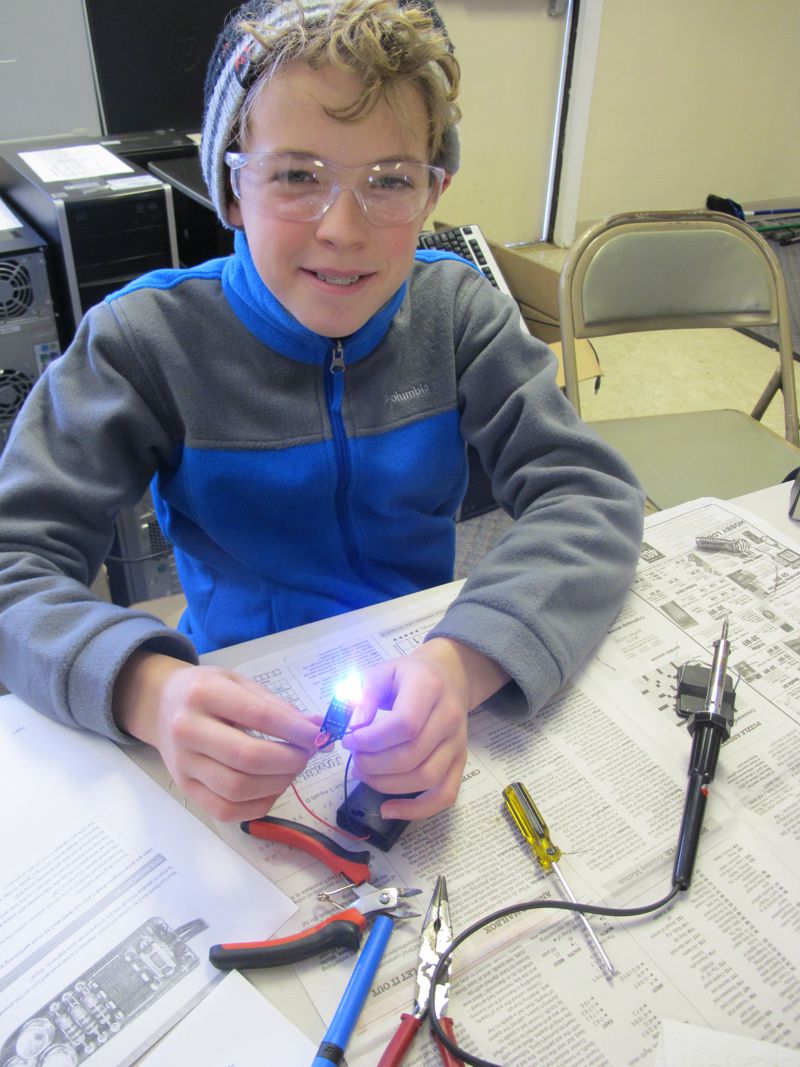
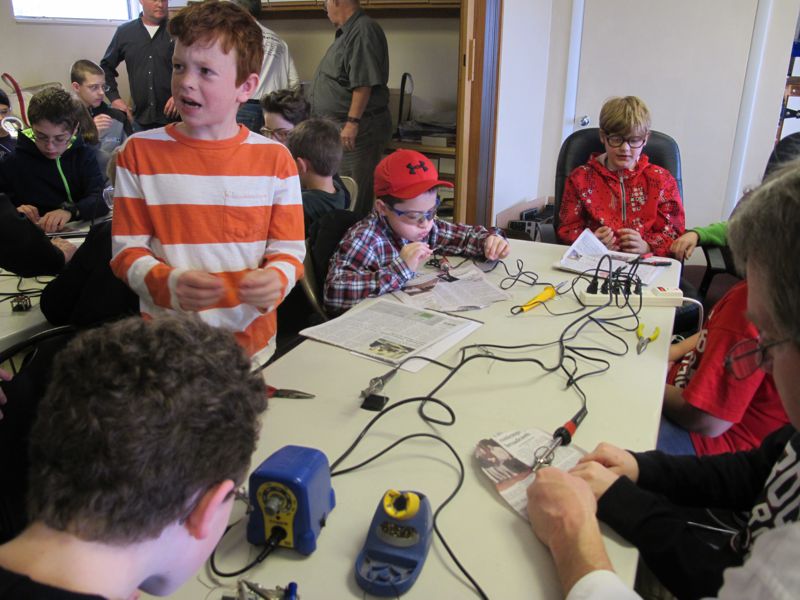
The LED chaser kit (Velleman MK173 rev2) was a medium difficulty build; in retrospect something easier for first timers would be better. But the coolness factor is very high, you can see it in this video link to Connor’s just after he finished. The socket helps protect the IC from overheating, but 44 solder joints is a lot to do. Solder pads are close together on both kits, not unusual, which offered opportunities for many kids to learn unsoldering techniques (some more than others). Glad we had a couple of solder suckers to clean up the bridging and over ambitious solderers! We also had one solder pad on one of the boards come loose but hard to tell if that was a circuit board problem or not.

Another completed RGB LED blinking kit.

The color changing LEDs kit (Lux Spectralis 2) was definitely simpler with 24 solder points, but was bought on clearance so now hard to find. It has 38 modes of color/flashing to choose from and could be easily finished under an hour or less. The IC (ATtiny13a, no socket included) held up well to overheating, least from our experience. One kit was short a few parts, something we’ll plan for next time.

We’ll be doing more learning to solder classes, this is a skill that generated an lot of interest from both young and old. Our next meeting will be using App Inventor again, part of our series building up to Arduinos and other microcontrollers.

Learning to Solder

Our first ‘learning to solder’ session last Sunday drew quite a crowd. With 20 kids showing up and quite a few parents there too, we packed the FYCDP house on Crown Street. George Edenfield, who’s involved in Putnam County Auxiliary Communications and an active amateur radio operator, helped lead the session. Many of the kids brought their own soldering irons or borrowed one from a parent, but only a few had ever soldered before.

Before tackling the circuit board and real electronic components, the kids practiced on soldering wires together.
Before tackling the circuit board and electronic components, the kids practiced on soldering wires together.

After going through the basics and soldering safety, George had everyone solder two wires together so they could learn how to handle a soldering iron and learn how to recognize a good soldering joint. We then moved on to a small kit that creates a ‘chaser’ effect in 6 LEDs. The kids picked it up pretty quickly, although most needed someone to help them with the first soldering joint on the small circuit board. A few even got to learn how to use a solder sucker (desoldering tool) when they got a little carried away putting solder on the copper pads on the circuit board. Desoldering techniques, a possiblebackup topic if there was extra time, will be covered at a future meeting.

Another table starts their initial soldering task.

Although the kits didn’t get completed due to time and everyone helping each other, everyone kept saying how much they liked it and wanted to do more. So we’ll continue working on those that didn’t get it completed at our next meeting, February 14th, and for those that did or missed the Jan 31rst meeting we’ll have another simpler, quicker soldering project. It was so popular we ran out of the chaser kits.

Cardboard Virtual Reality

Google Cardboard Kit components. The magnets become a switch for the cell phone's magnetometer.
Google Cardboard Kit components. The magnets become a switch for the cell phone’s magnetometer.

Today we assembled some really inexpensive Google Cardboard kits and explored different 3D virtual reality programs that use a cell phone for viewing. By using the cell phone gyro for judging head movement and the magnetometer as an input device, with a little cardboard and a couple of lenses you can experience virtual reality!

We started with some ‘un-certified’ Google Cardboard kits, I suspect these are version 1 models vs. the latest version 2. These do not have the QR code that can help with configuration. These particular units don’t come with any instructions, which since they don’t strictly follow the Google Cardboard guidelines, made a little more challenging build. But really not that hard and adding some masking tape made them even sturdier. And they do work!

Rebecca discovers that the view is 360 degrees by looking up at the sky.
Rebecca discovers that the view is 360 degrees by looking up at the ‘sky.’ The adults are exploring what additional apps we can try.

The real fun began after Alice got her’s assembled first and then began wowing… everyone else starting racing to finish theirs. The technology is impressive and the demo app is a great place to start. There are so many more apps out there already that it will take some time to learn the best ones. Some of us old folks liked the Paul McCartney video app where you are on-stage for one of his concerts and can look around 360 degrees to watch things from the band perspective. Impressive fireworks and sound too! The VR Roller Coaster app was a hit with the kids, although I think all of them also tried the different cities in the demo, starting with Paris where you can walk around the Eiffel Tower.

Testing the Ozobot

Experimenting with ozobots & cubelets
Dunkin works on one of the prototype tests for the ozobot. A few cubelets are in the lower left corner.

In today’s meeting we looked at ozobots & dug out the cubelets to try and get the Bluetooth control working. Technical difficulties prevented the cubelets from  working with the remote control app. But the ozobots were a bigger hit anyway with both the kids and adults there.

Ozobots are tiny dome like robots that have optical sensors that are used to follow lines. These lines can also program the little guys, through shapes and colors. Using a marker they will follow the line you draw but by using different color patterns they will change speed, change direction, pause, stop and even count.

Castlemaker kids try an ozobot on the maze they created
Path that the kids developed to test the ozobots. In this trial it’s not doing so well, but has a chance to redeem itself if it gets the square root of 1 correctly, otherwise it goes into the “imponderable death of doom.”

It was amazing to sit back and watch the kid’s creativity. After a brief introduction to the ozobot, the kids discovered much more on their own. Following mazes and lines drawn on paper, along with guessing which branch the ozobot would take dominated the afternoon.

The kids decided to “test the robot’s artificial intelligence” by creating questions that the robot could ‘answer’ by choosing the right path. The maze they created started with simple questions like 4 divided by 4, then progressed into more difficult questions like which country created french fries. There were plenty of death traps and black holes along the path for the ozobot if a wrong decision was made. They decided to conduct tests for both ozobots , you can watch one trial in this video. Of course the robot didn’t really evaluate the questions, just took a random path, but they still had fun.

Castlemakers_Ozobot_Maze
The final test path they created. You can see one of the ozobots following the line near the top of the picture. In this trial it picked the correct answer for 4 divided by 4 and even chose the robot vs. human path.

The ozobot color changing capability was a huge hit (different colored lines cause the bot’s LED to match the line color). They are somewhat sensitive to line width, but it’s not a huge factor. The large dry erase board attempt didn’t work well, the bot would eventually scrape off some of the marker then stop. Ozogroove, the dancing app, was pretty useless on a Nexus 7 – don’t bother to install it on that tablet at least.

We’re going to have to experiment some more with hand drawing the ozocodes, the programming language for the robot. It seemed to be inconsistent, sometimes working and sometimes not, even for the same color coded lines. Printed ones worked great. There’s also a coding language, ozoblocky, but that will be a future meeting.

Model Rocketry in Putnam County

Rocket launch picture
Rocket being fired from pad #2, which was for some of smaller rockets.

Rocket launching was the theme of the day last Sunday for the Castlemakers that could attend. Nick and Emily Adams extended an invitation to a Rocket Launch at their place south of US40. Four families, along with some invited friends and Castlemakers got to see a wide variety of solid propellant rocket launches in South Putnam County.

Pad #1 was used for some of the larger rockets. Up to size G rocket engines can be used without FAA approval.

Amateur rocketry has been popular for years; many people will remember putting together Estes rockets as kids growing up. That still continues, with additional firms involved, with more gps units, cameras, electronics and even Arduino boards. Many of the tools used in a fab lab/ makerspace are being used! For an example check out the Carbon Origins effort (10,000 feet & Mach 2 before breakup); their story was detailed in a recent article. We didn’t see that kind of launch on Sunday, but there was a video of a Mach 1.5 flight Gus hit the day before at a site near Chicago (and he does a lot bigger rockets).

Gus Piepenburg mounts a camera on the side of number 13 before launch. It wasn't the lucky number of the day, the landing didn't go well and it will become number 14 with some improvements.
Gus Piepenburg mounts a camera on a model CM-10 Bowmarc before launch. The flight didn’t go well, landing in several pieces, and after changes it will become number 14.

What we did see on Sunday was incredible. There were four families that had built multiple rockets, all involved with Indiana Rocketry, and there were two launch pads and 4 towers to launch rockets. I noticed several with GPS units (one hit 2500 feet) and several had cameras. One even had the infamous 808 keychain spy camera, sometimes used in robotics, that had a 3D printed camera case on the side of the rocket.

The local Putnam County 4H has a rocketry group if you’d like to get more involved, or you can also contact the Lafayette-based Indiana Rocketry club which has even more information.

Packing Tape Ghosts

Wrapping plastic wrap to make clear packing tape ghostly objects.
Wrapping plastic wrap and clear packing tape before removing it to make ghostly objects.

For the October 18th meeting we made packing tape limbs and ghosts. Well actually we tried everything from baby dolls to swords, and even mixed in a few body parts – basically anything that could be safely wrapped in plastic wrap and then covered in packing tape.

Baby Ghost made from clear packing tape
Ghost made made by using a baby doll. It will get more transparent after removing more of the excess plastic wrap.

Wrapping an arm or leg and the manikin were definite hits, and looked surprising good! The process is fairly simple: put a couple of layers of clear plastic wrap on the item, then wrap it with several layers of clear packing tape, and finally making a cut in the wrapping to remove the object used. Once the object is removed you take out the excess plastic wrap and carefully re-tape the pack tape wrapper back together for a clear ‘shell’ of whatever you wrapped! Adding some LED lights inside the object can make a great ghost or really strange object for Halloween.

For our upcoming meetings we’ll be having a intro to coding class for 9-14 year old kids and a soldering class, next meeting dates are on our events page.

Make Your Own Casting

sand block carving for aluminum
Sand block carving for the upcoming Community Aluminum Pour in Greencastle at the Peeler Art Center on DePauw University’s campus.

9/30 UPDATE: There are still sand blocks available for carving as of today, stop by Peeler Room 105 to make one!

A quick note on the Community Aluminum Pour; Thursday September 24th is the last day to make an original piece of art that you can have cast with recycled aluminum. From 4-8 pm you can carve your own design into a sand block that will be cast on October 2nd. There’s not a lot of information out there yet (although it has been listed on our events page) and carving is limited to 200 participants; but both the carving and casting is open to the public. I stopped by last night – still plenty of sand blocks available for carving!

If you miss the carving or don’t want to make your own casting, the main casting event will be on Friday October 2nd from 1 to 10 pm (back courtyard of Peeler Art Center). Looks to be fun, Sculpture Trails Traveling Foundry will be there to help and will be explaining the casting process.

Banana Tatooing

At our August 23rd meeting we got updates from the teams on how their Water Balloon Challenge ‘devices’ are coming along. The Barcus Bunch showed their video on development and testing of the air-compressor powered water balloon launcher for the upcoming Water Balloon Challenge, raising the competition level for all of us making launchers!

Castlemaker kids take comis to tatoo some bananas.
Castlemaker kids take comics to tattoo some bananas.

Besides the air-powered units, there are reports of the classic latex tubing powered units and rumors of a Gatling gun style unit going for the quickest reload time category. It’s going to be an interesting competition, which will be at Big Walnut Sports Park on September 13th. Please check our events and project page for updates.

Some example tattoos that were made by using needles to bruise the skin.

Our making project for this meeting was tattooing bananas. After first talked about how skin tattoos worked we then talked about the process of how fruit changes colors when bruised.

After putting bunches of bananas on the table, everyone took needles to bruise the skin so it turns brown. Some used Sunday comics to trace the character outlines on the banana, others just designed their own tattoo free-form. Conclusion: there’s nothing like personalizing your own banana so no one else will mistake it for yours!!

Liquid Nitrogen – August Meeting

What happens when you hit a marshmallow frozen at -196°C.
What happens when you hit a marshmallow frozen at -196C.

At our August 9th meeting we covered the Water Balloon Challenge, which is now up to 8 groups. Details on our project page, but they seem to be performing so well that we concluded that the Greencastle Farmer’s Market display in early September should be a demo, not the actual competition, since the Greencastle square may not be large enough!

What happens when you insert a balloon into liquid nitrogen. There's also a video where you see it shrink and then expand.
A balloon being shrunk by inserting into liquid nitrogen before re-expanding, the record was 4 times for one balloon!

For our ‘show & tell’ portion Chris brought liquid nitrogen in a dewar for experiments. After explaining describing liquid nitrogen and where it comes from, we poured the -196°C (-320°F) liquid over the marshmallows that Alice had brought in. We also froze a banana to drive nails into a piece of wood and then tried lots of things that kids and the adults suggested. Some that worked and some that didn’t!

A raw egg that was frozen first with liquid nitrogen then melted down during the meeting back into a normal uncooked egg.
A raw egg that was frozen first in the shell with liquid nitrogen then thawed down during the meeting back into a normal uncooked egg.

Freezing balloons was a big hit, the kids had tons of questions which you can hear and see in the balloon video that Brian H. took. For the coin collectors there, we showed how older copper pennies are more malleable at minus 200 degrees Celsius than the new copper plated zinc pennies – which shatter after hitting them with a hammer!

There’s another good regional event for science in Bloomington on 8/29, Makevention, along with some other events on our events page. Last year we took one of the shovercraft (shoveable hovercraft) to the Bloomington event and did demonstrations. It’s well worth the trip if even to just to look at what other people are doing.

Since we’re starting to look for projects after the Water Balloon Challenge, I can’t help but mention the Lexus created hoverboard that uses liquid nitrogen. I just watched a video (long version) on it, sort of outdid our shovercraft but a lot of more engineering in that design. Now that would be an awesome next project!

July 2015 Castlemakers Meeting

Alice tries flying Isaac's drone that he brought to the meeting.
Alice tries flying Isaac’s drone that he brought to the meeting.

At our July 26th meeting we shared and discussed the upcoming Water Balloon Challenge in August. Interested kids & adults signed up and there are 5 preliminary teams creating something to launch a 2″ diameter water balloon farther than you can throw it – but there are several more rumored to be forming and folks can join in at any time.

Some of the kids afterwards viewed the drone videos from earlier in the day. You can see one of them on our Youtube channel.

Special thanks to Isaac & Matt who brought their new drone for the sharing portion of the meeting. All the kids that wanted to try it got to fly it. We also learned that one is very durable!