As a nonprofit organization we elect our board & officers during January and use the annual meeting to look back to help with planning going forward. The pandemic hit us hard like many organizations that rely on volunteers, people, and contact with others. Even with our conservative nature and financial reserves it was a challenge; we made it through but the aftereffects continued throughout 2022. And like everyone else utility and other costs went up significantly. Sometimes as much as 20%, which is difficult for a small all-volunteer nonprofit. After some downsizing and cutbacks however, by the middle of 2023 it appears we turned the corner – and since seeing more interest, donations, and volunteer activity.
While members help cover our costs, donations from other organizations are critical also. Walmart Foundation‘s Local Community Grants have really made a difference in letting us continue our program efforts – many people don’t realize how Walmart through their foundation helps many local nonprofits. We’ve also received in the last 2 years a grant from Buzzi Unicem and were a Darrell Wiatt Family Philanthropy Essay Contest recipient through the PCCF – both greatly appreciated.
Individual private donors have also made a difference, we’ve listed many of those on our contributors webpage. You can also help – stop by during our Open Shop hours and ask to learn more, or you can donate directly through our website, or help out by volunteering with our organization!
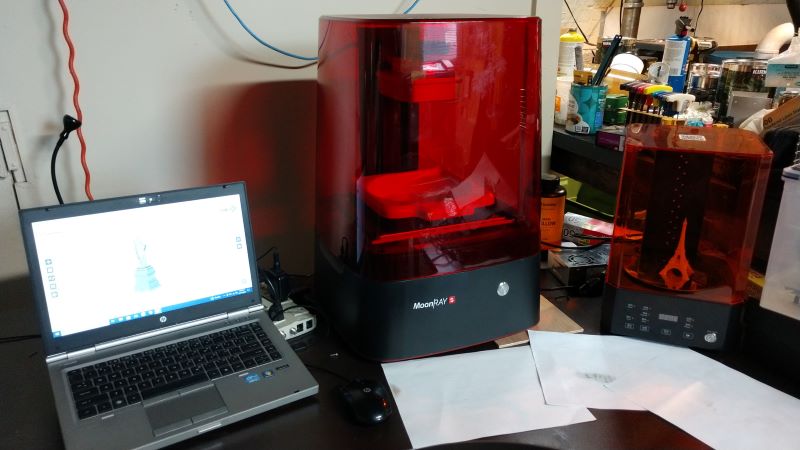
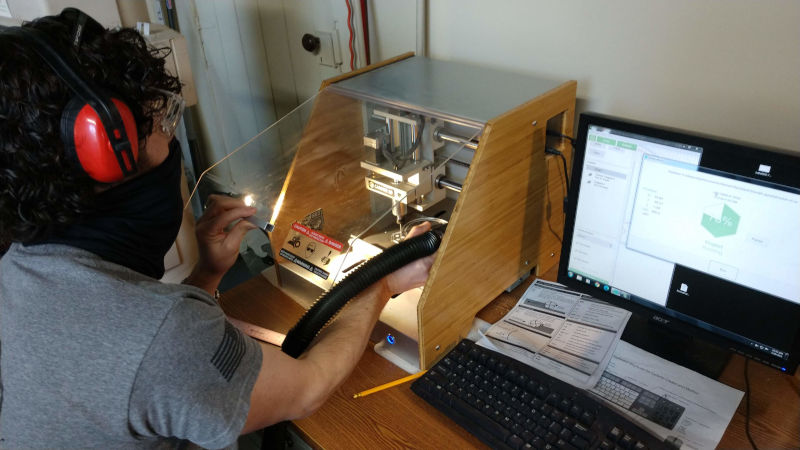
Last year we had a Stereolithography (SLA) 3D printer donated to the makerspace and finally made time to get it up and running. The makerspace has been using using fused filament fabrication (FFF or FDM) since we moved into the physical makerspace and myself longer than that, but have resisted making the leap to other forms until now.
Our Resin 3D Printing workstation
SLA so far has been pretty much what I expected: really great resolution and detail but it’s more complex dealing with the uncured resin. Post-processing time and especially cleanup is more involved than FFF, so processing 3D prints in batches makes a lot of sense. We haven’t experimented much with different resins, cost of the resin feels like it it is much more than FFF printing, although it’s a difficult comparison since SLA prints use a lot less resin and the uncured resin can be reused if you’re careful.
Eiffel Tower Printed at 50 microns
But oh, what resolution compared to FFF printing! You’re hard pressed to see the height layer lines when printing at 50 microns (yes, that’s .05 mm or .002″) and ours will let us print at 20 microns if you’re willing to take the time. X and Y dimensional resolution is at 75 microns (.075 mm/.03″), which is something you’re not going to see coming out of a filament nozzle printer. Of course for those levels of detail it will take longer to print, although the Digital Light Processing (DLP) system helps make the individual layer printing time much shorter.
There’s some other minor differences, like the way you have to think about supports since the prints are pulled out upside down out of the resin tank. But it’s a nice tool and addition to the makerspace. Stop by sometime & we can show you what we’ve printed. We always have a class in November or December for folks to learn about 3D printing by making holiday ornaments, watch our events webpage or sign up for our newsletter to find out that date and more.
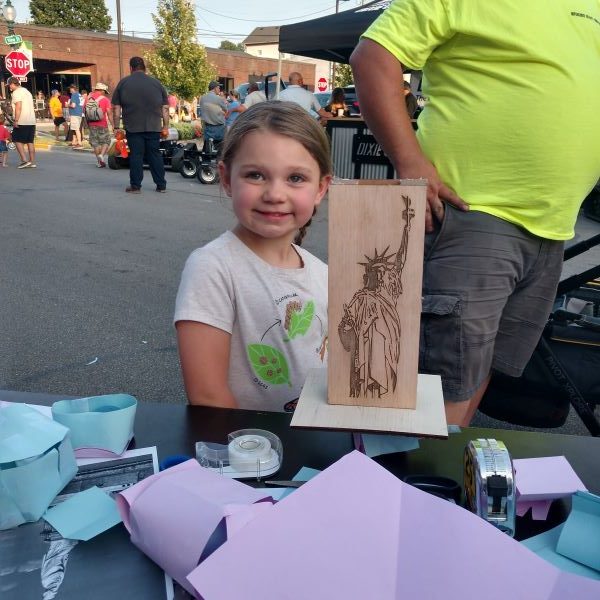
Greencastle’s First Friday’s have become one of our favorites that we look forward to at Castlemakers. It’s become a tradition for us to have a youth-oriented hands-on project on Franklin Street during the event, plus we get to show off projects going on inside the makerspace for anyone interested.
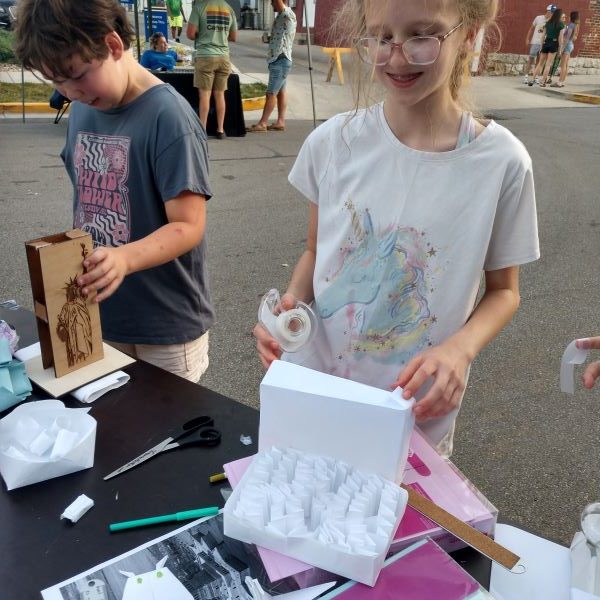
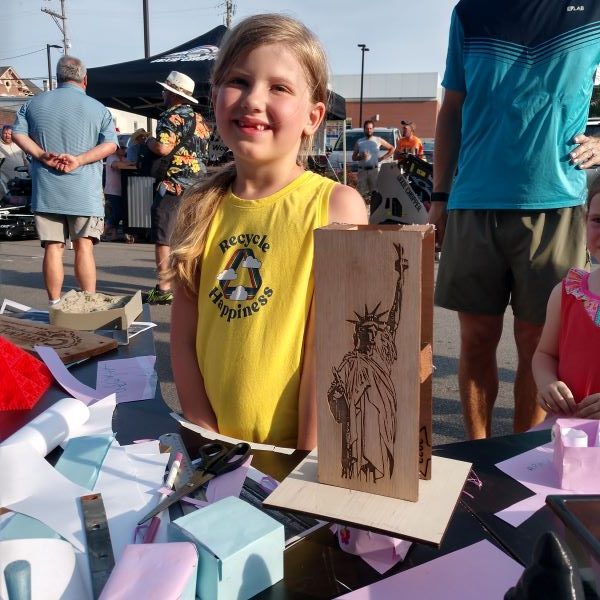
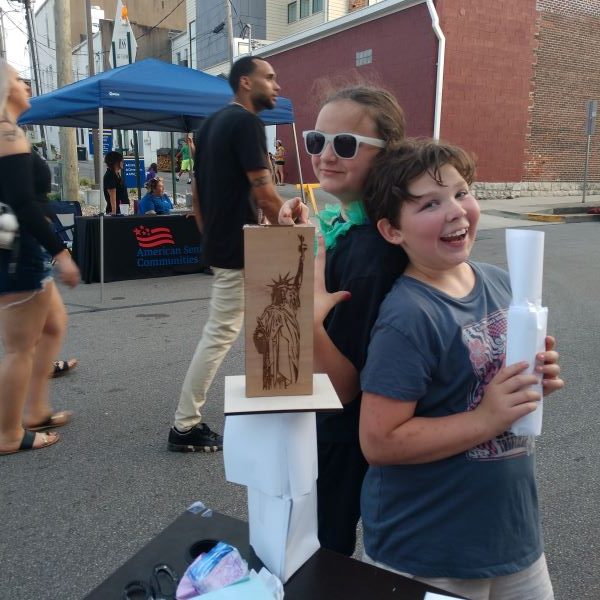
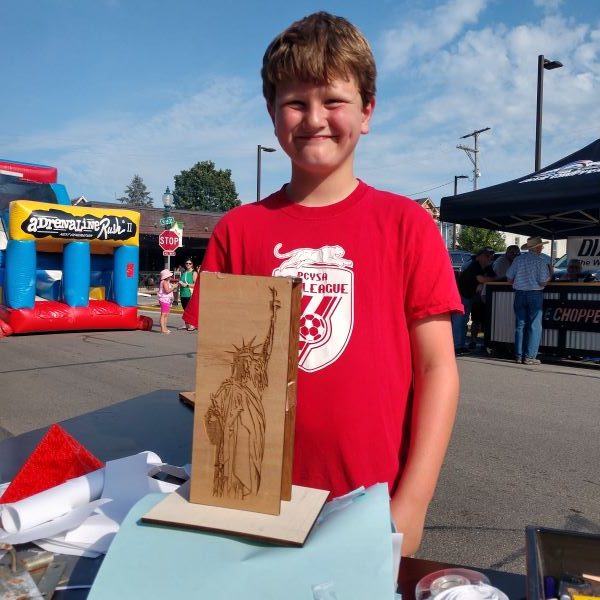
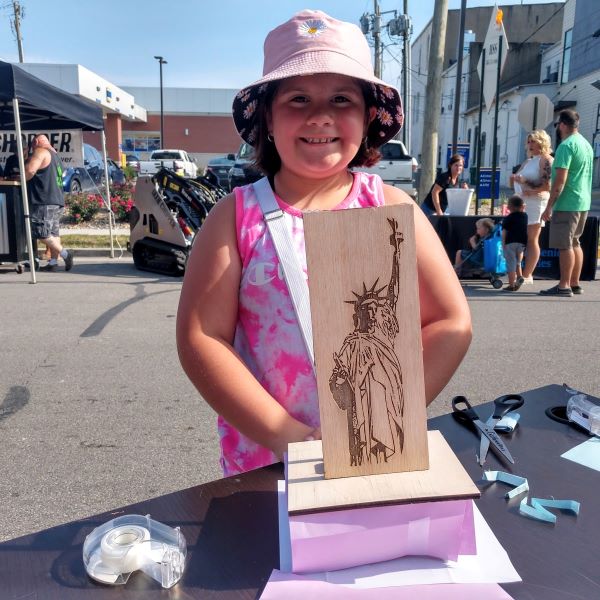
For this month’s creative challenge we chose a 4th of July themed project, challenging people to build a base out of red, white, & blue copy paper with tape to support a Statue of Liberty. The Statue of Liberty was made using our laser engraver/cutter and had a lead weight inside to make it a little more challenging. And photos of the real thing were there to help folks come up with ideas.
Experimentation & creativity in building was abundant!
Another successful base built!
There were some really creative solutions generated by youth building the base – definitely some signs of potential future engineers. I was expecting to see a few discover and use the edges of the paper since they can add more height than the flat portion. I wasn’t expecting so many different creative ways they would that concept. We even had one young woman create a box, then fold strips of paper inside to provide a very strong, yet clean outside base that looked great!
Our next upcoming First Friday event is Friday August 4th from 6-8:30 pm on Franklin Street. And of course you won’t want to miss our annual Putt Putnam County, where we take over Franklin Street to show off community build mini-golf holes for everyone to play on a Friday night.
The ‘who could build the tallest’ competition went on for quite a while…
Occasionally we have items we can’t use or too much of a good thing, which we then use as a fund raiser for the makerspace. If you’re interested in these items, please stop by during Open Shop hours and then take a look/make an offer to help our our cause!
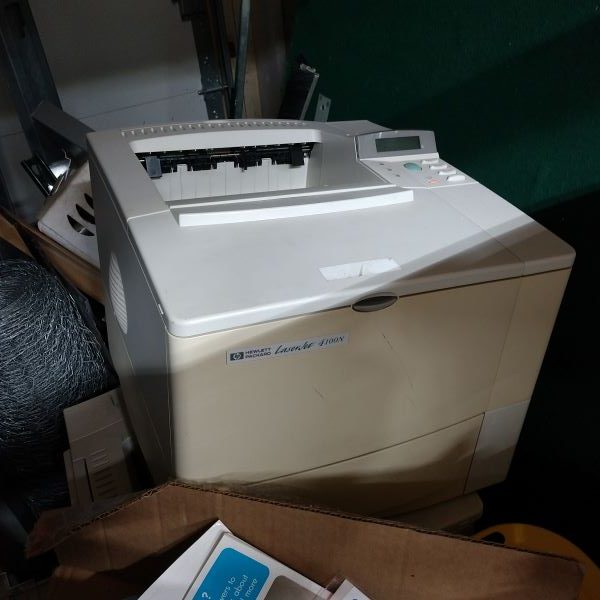
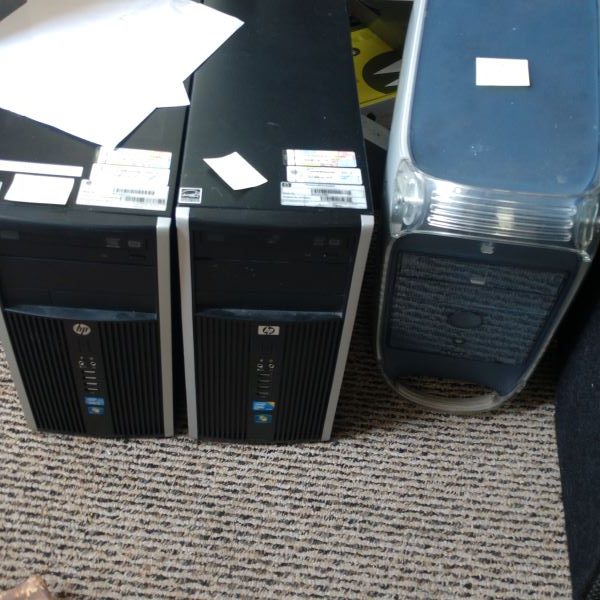
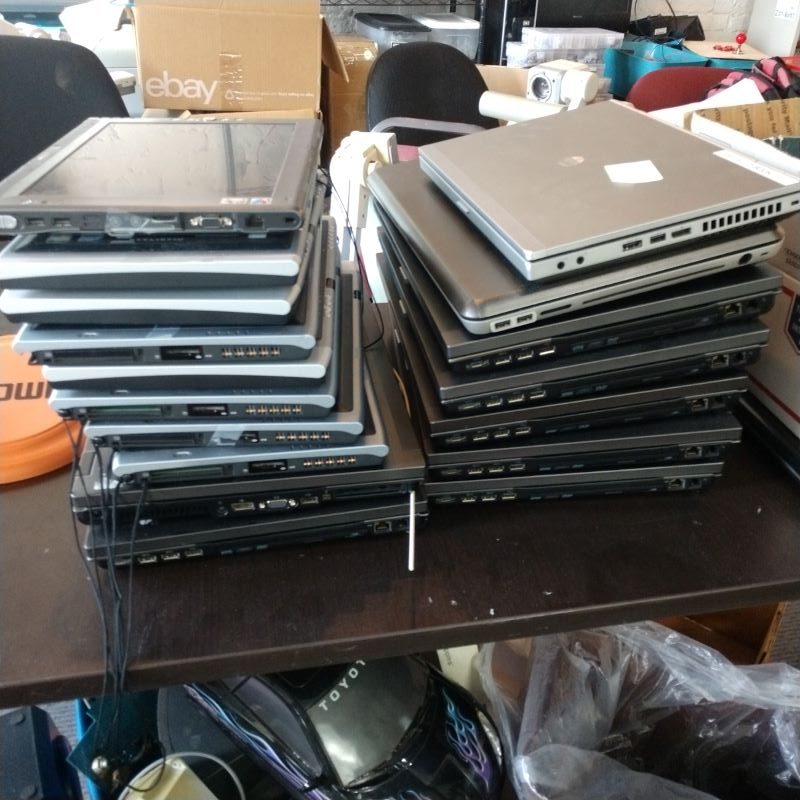
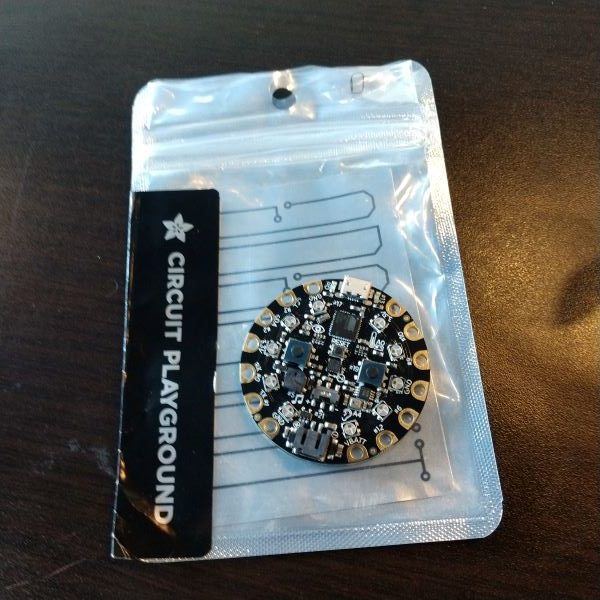
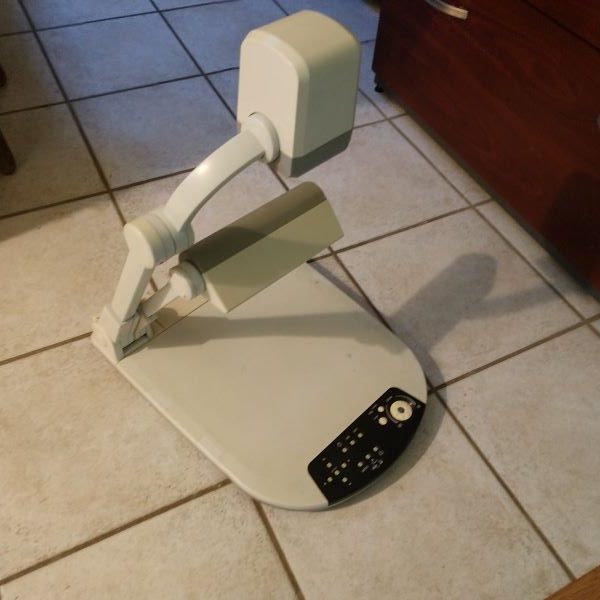
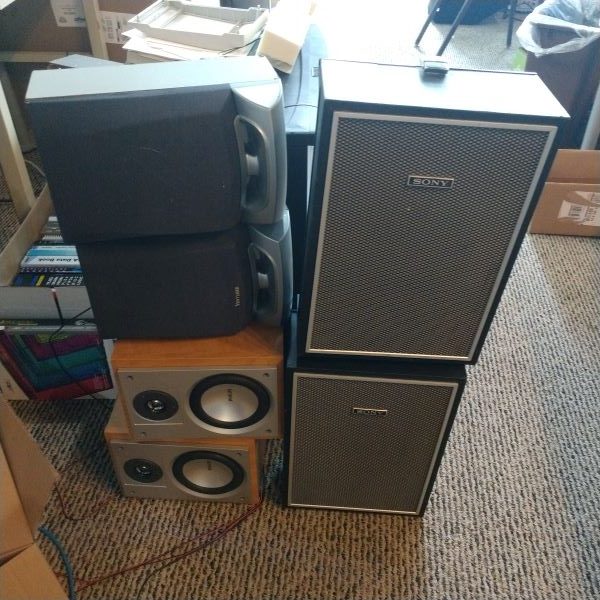
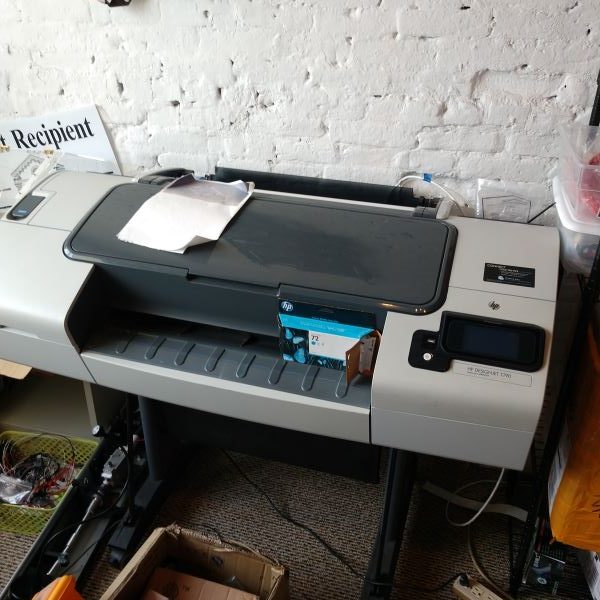
We have 4 HP 4100N b/w laser printers, some with duplexers & extra paper trays. We also have 2 HP LaserJet 1300 printers, at least one works ($25 for that one).4 Win7 HP 6910p laptops, in various states & some accessories (only a few docking stations left). These were used for our classes at the makerspace, but have been replaced with newer models. We’ll make you a deal!!Older working desktop machines, more being added.More laptops! Includes Win7 and Win10 models – please help us by buying one!8? Adafruit Circuit Playground Classics, a great little sensor loaded single board computer that is Arduino based. Make an offer!We have a lot of working Elmo document cameras, incredibly useful devices in multiple ways – including viewing small object with a monitor hooked up. Most need power supplies, but readily available (you can find remotes too!).LCD monitors, monitors, & more monitors! VGA input $5, DVI $10, OBO… quantity deals consideredLOTS of speakers! Many more not pictured, including portable bluetooth speakers some with built-in battery.HP Designjet T790 wide format color & b/w network printer. Prints on roll paper (some included) and large format paper for prints. Figure we’ll have to sell this one on eBay, but if someone local would like to give us a donation… Full sized www.juststand.org for computers.
On Tuesday evenings and Saturday mornings we have open shop time at the makerspace. It’s a time when folks can bring in projects and our members, or anyone who happens to be there, can try and help people create, repair, or build something. It often becomes a fun community sharing time at a spot with lots of maker tools along with various STEAM kits and projects to keep younger kids busy also.
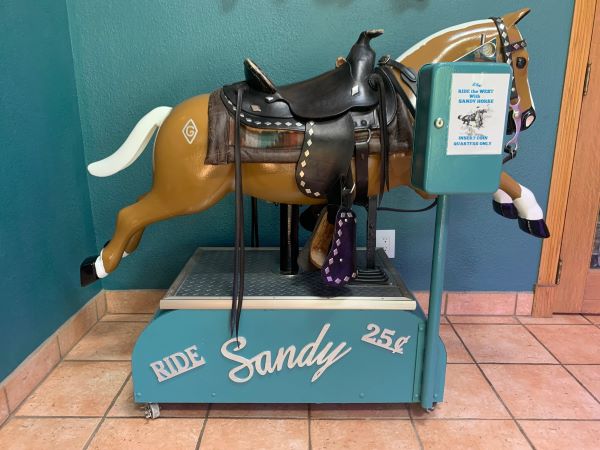
Sandy’s horse ride letters created by our laser cutter
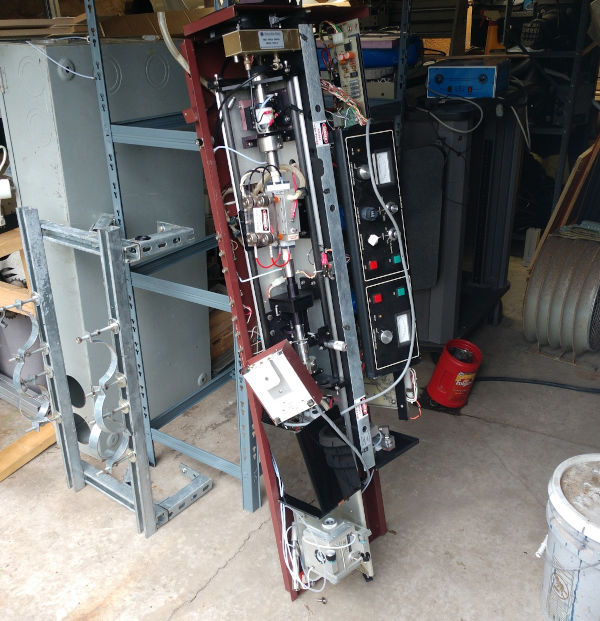
Some of the projects that come in are pretty fascinating; ranging from helping restore a coin-operated hobby horse to figuring out how to build a wheelchair cart for a duck(more later on that one!). We also get folks that want help assembling something – those have ranged from 3D printers to even a forge(perhaps a good thing we couldn’t find our propane tanks at the time).
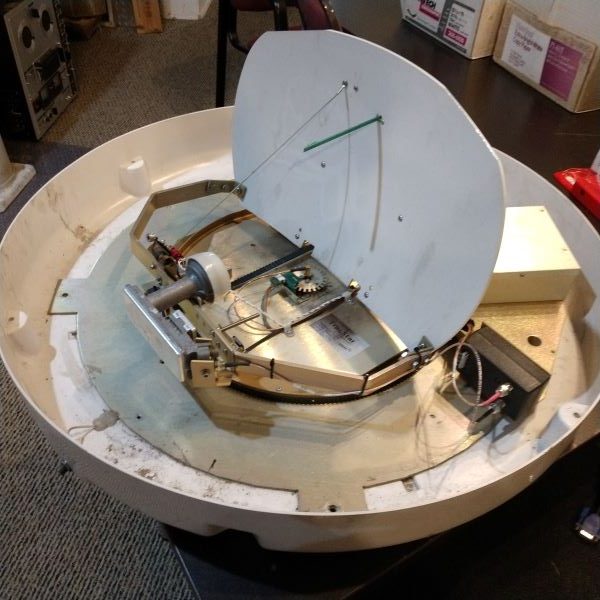
RV satellite tracker brought in that we’ll try to use for ISS tracking.
But often it’s someone bringing in something to give us to fix or teardown later like a bass amplifier or reel-to-reel deck. Even if they can’t be fixed, they make great tear-down items for kids and adults to learn about how things work – we’re big believers in learning through finding out what’s inside. In fact, right now we have a lot of things to tear down for components and/or salvage – stop by and learn something with us!!
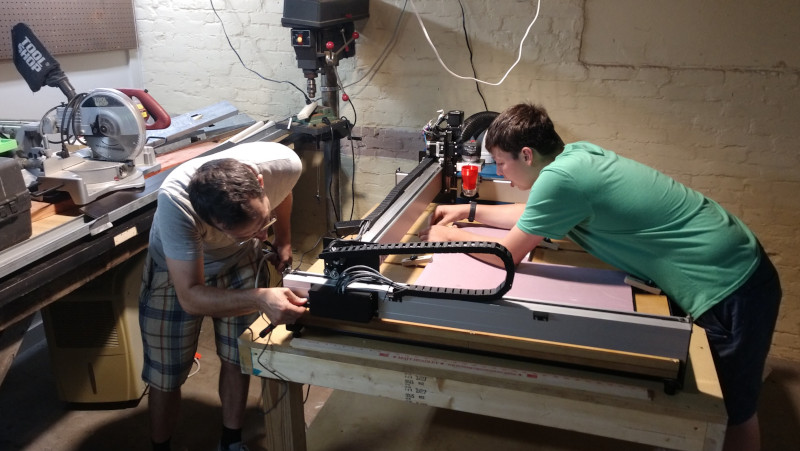
This summer we decided to make some changes to the layout at Castlemakers. Perhaps the most visible was moving our Shapeoko XXL from downstairs into the middle room on the main level. With all the parts & equipment donations that we also received this summer, it’s felt like a big project – which it has been. But we’re beginning to reap some of the rewards of the move with better equipment utilization, even if we’re still not done yet.
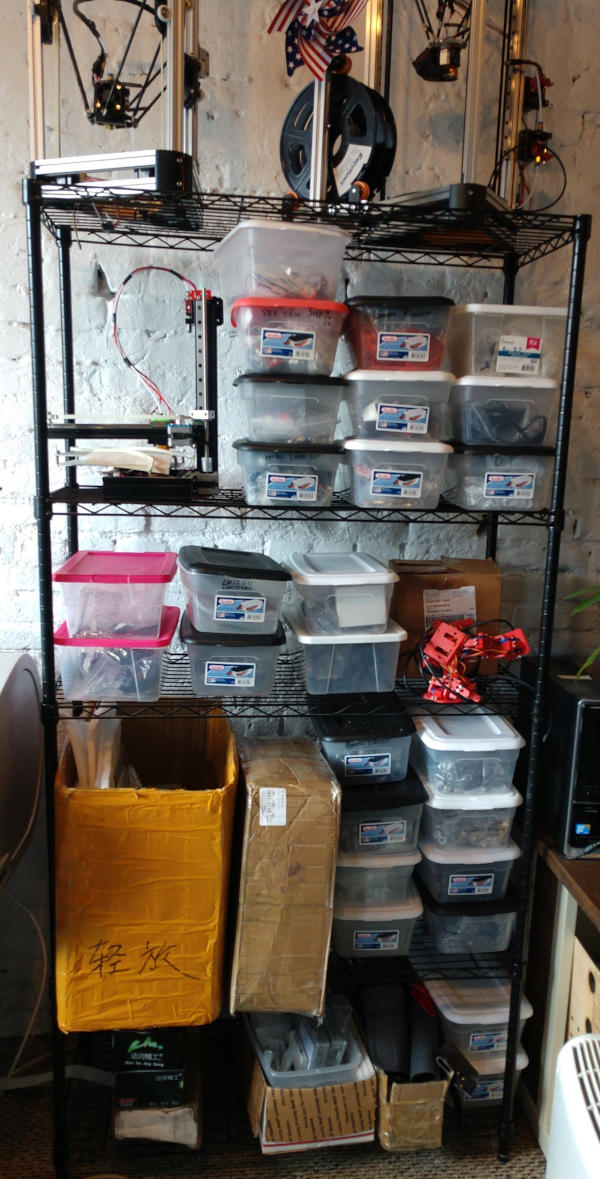
1 of 5 shelves of electronics & 3D printer parts!
This summer also brought in a large amount of unusual equipment, from electronics, laptops, & printers to a rather large Nd:YAG laser! We’ve got plenty of tear-down material for inquisitive minds right now.
But the most incredible gift was from Travis & Weiwei Chao, who formerly had an eBay store that sold 3D printer, CNC, & electronic parts. When they decided to sell their house & then close their eBay store, they gave what was left to Castlemakers! We now have lot of extra components at the makerspace & plan to use the parts in future classes at Castlemakers. Stop during our Open Shop times if you’d like to see the new things we got or just have an urge to take something apart to see what’s inside…
Mini-golf holes were down both sides of Franklin Street during our annual Putt Putnam County event.
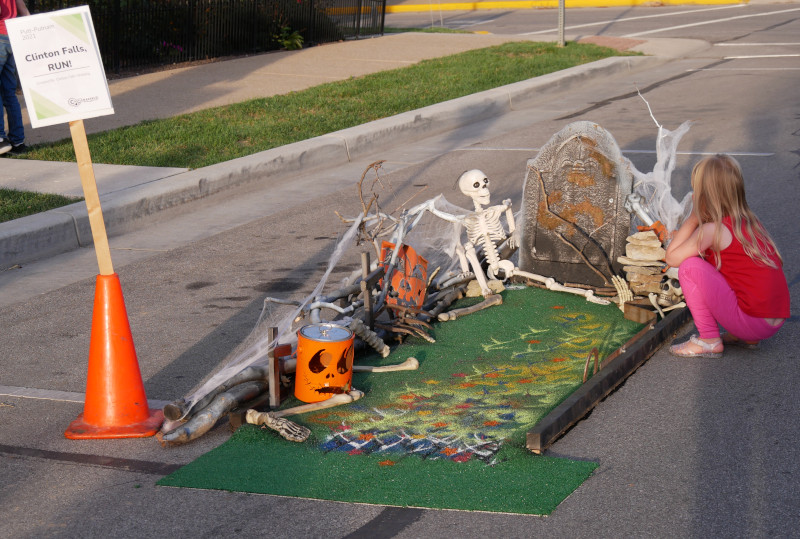
The Covid pandemic seemed to unleash a little extra creativity in our community and it showed in our annual Putt Putnam County tournament. We certainly had the largest turnout yet with 14 locally built mini-golf holes at the event held again during Main Street Greencastle’s October First Friday downtown.
The skeleton talked & lit up at night.
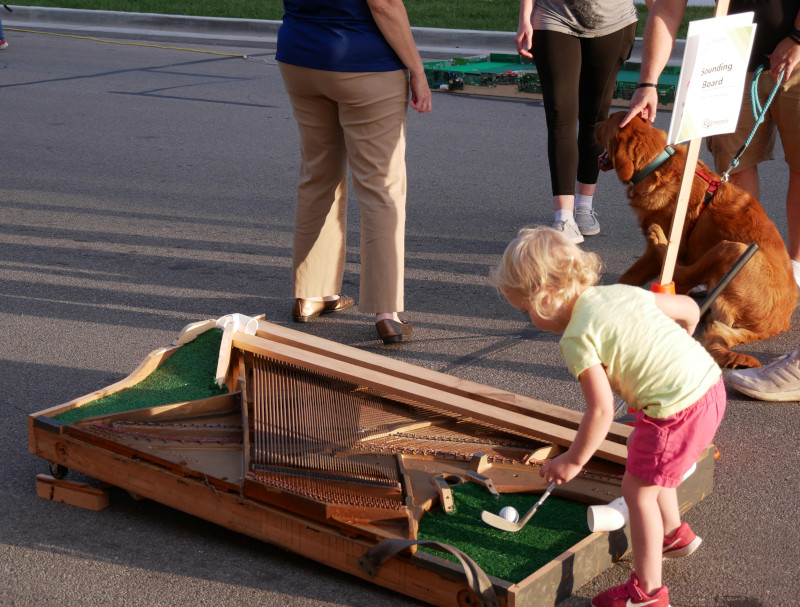
There were so many interesting holes this year it’s too hard to pick out my favorites. Ranging from the fairly simple “Back and Forth” (why didn’t I think of that?) to our first Halloween themed and a pachinko inspired hole called Plunko. And really, making a piano sounding board with strings into a hole so the golf ball made sounds?
Sounding Board was made from an old piano.
There were even a few re-worked older favorites, including the Kirsch Dental ‘hit the ball through the chomping teeth’ and PCPL‘s Alice in Wonderland (don’t go down the rabbit hole though!). There were really too many holes to detail and I can’t do them all justice. If you didn’t see this year’s mini-golf holes, be sure to come next year to play through the course. Or better yet, start planning to build a hole and bring it to the 2022 event – Friday night October 7th in front of Castlemakers on Franklin Street!
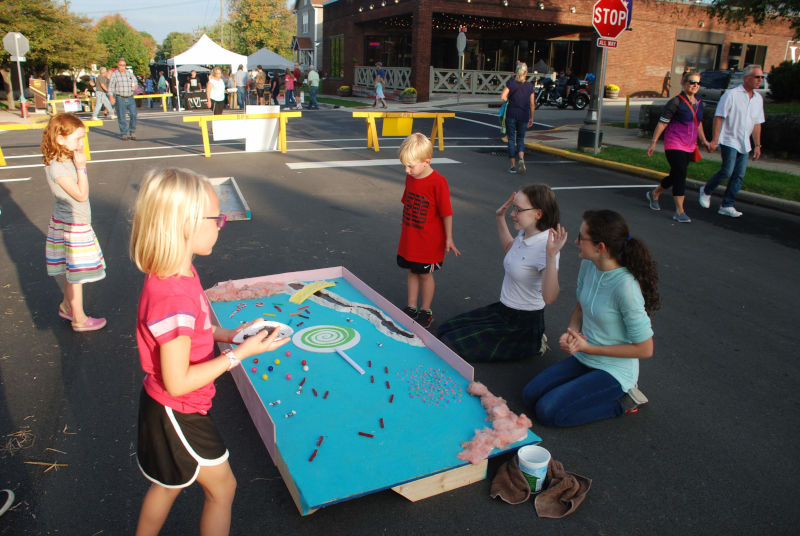
Candyland golf hole built by Alice, Bella, & Rebecca.
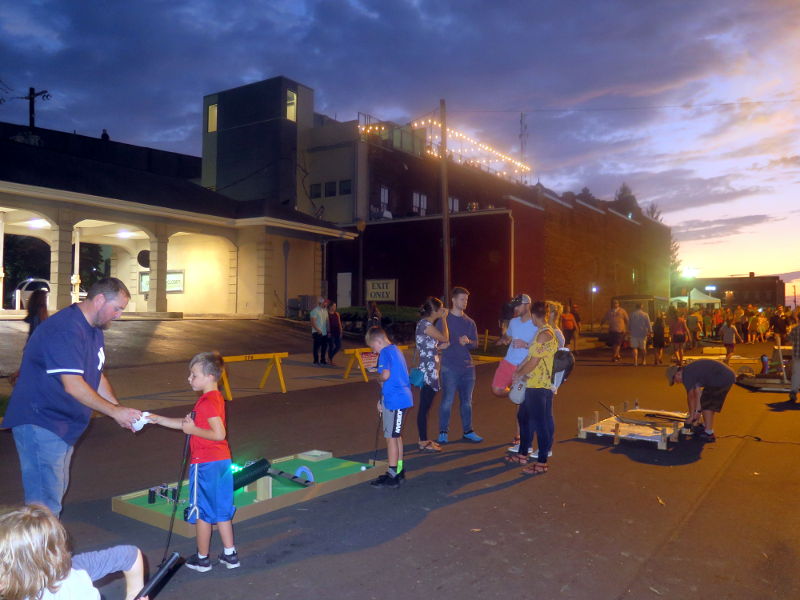
Picture of Franklin St as the golfing began to die down…
It’s the time of year to start building a mini-golf hole for Putt Putnam County! This year the mini-golf holes will be on display and playable during the October First Friday from 6-8 pm.
For the annual event youth, families, groups, and businesses create a mini-golf hole to bring that evening as part of the mini-golf course on Franklin Street. There are more details on the event, including building guidelines, on our website project page. We’re also certainly glad to help you build one. We’ve made some of the simpler holes in less than 2 hours, so don’t ‘putt’ off building one!
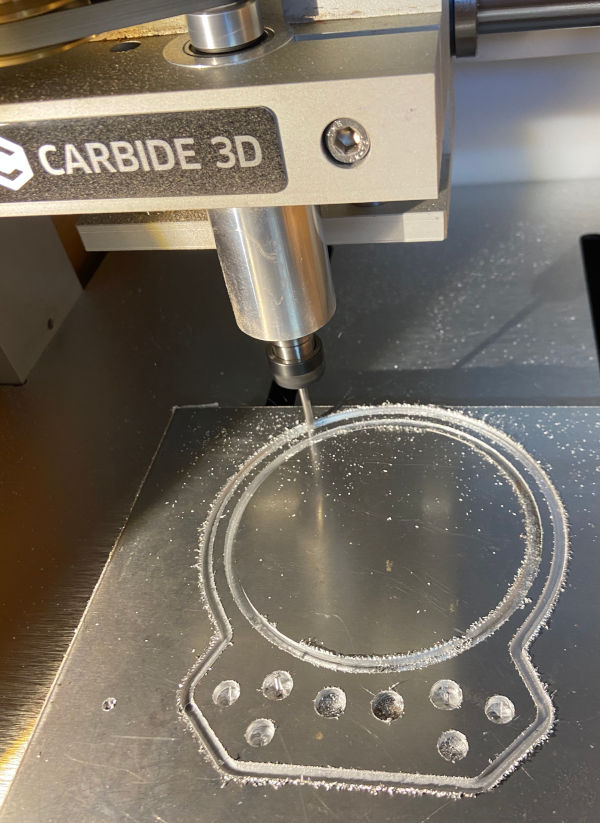
Machining the aluminum bracket on our Nomad 883. You can see videos of the CNC in action on our Youtube channel.
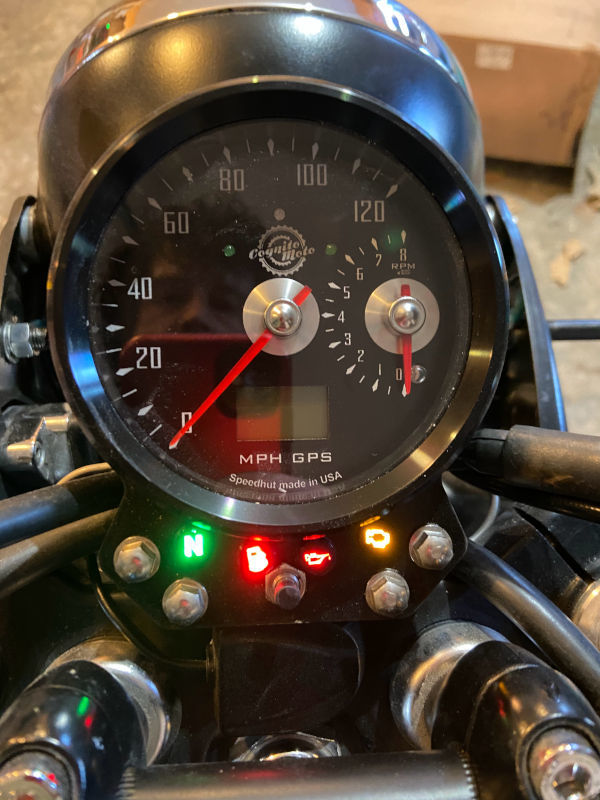
We’re certainly excited about the new electronic equipment capability at Castlemakers, but the makerspace is not just electronics. One of our members, Dan, asked about making a bracket for his 2009 Triumph motorcycle to install an upgraded combination gauge for the stock speedometer & tachometer. We’ve only done a little aluminum machining, and it can be a very slow process, but if you don’t try you’ll never learn what you can do!
Aluminum plate machining into a bracket.
The original gauge included some warning lights, which he wanted, but weren’t part of the upgraded combo gauge so they were purchased separately. So Dan needed to create a new bracket design to hold the new gauge and lights.
Finished Triumph bracket.
I’ll let Dan take it from here: “I used Adobe illustrator to make a vector file of the shape I wanted, along with holes for mounting the bracket and indicator lights. I made a prototype on the laser cutter, and after a few small adjustments, we made the final version out of 3mm thick aluminum with the Nomad desktop CNC. There are still a few little tweaks I might make to get the spacing perfect (I ended up having to hand-drill one more hole for a button I had forgotten about), but I’m happy with the result. Couldn’t have done it without Castlemakers!”
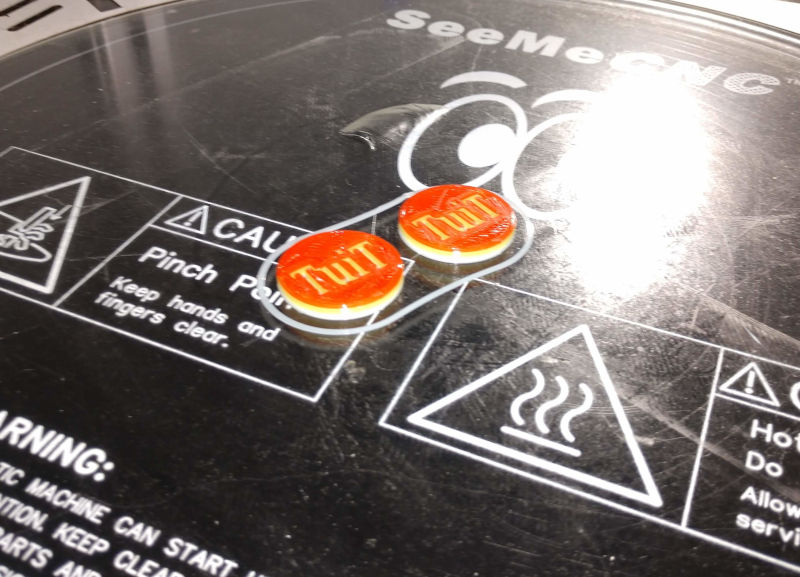
Multi-color Round Tuits designed in January 3D printing by class attendee David.
It’s exciting to be able to offer classes again, even though with a reduced size and constraints due to Covid. Introduction to 3D Printing will be offered on January 23rd at 1 pm and our popular Introduction to Laser Cutting/Engraving on February 20th. We’re hoping there’s also interest in some micro:bit classes, refer to our classes page for more information.
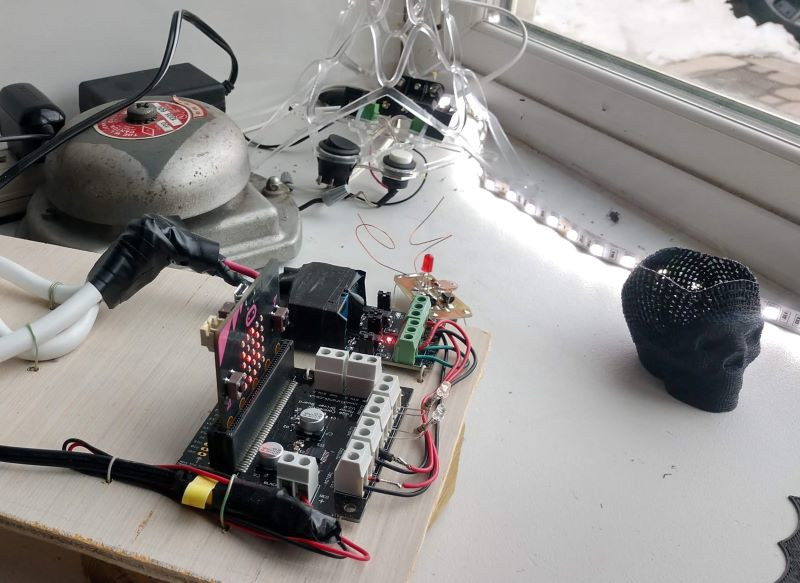
We’ve continued to experiment, a lot, with the micro:bit since giving them away to youth in the fall of 2019. The micro:bit capability is still impressive for a device that size. In the window of our Franklin Street location you can see several micro:bit projects, including some that have been written about before.
Window micro:bit that remotely flashes lights & rings an alarm bell!
One of the more mysterious window projects uses the micro:bit’s internal bluetooth radio. There’s been a micro:bit for some time that sends scrolling text and can control a string of lights and a rather loud alarm bell if the right text is sent wirelessly from another micro:bit to the window unit.
Hint: the words to send are obvious, it’s easy to program in MakeCode, and use Radio Set Group 1. It even works from outside! I’ll link later to some more detailed additional help.