It started at our Intro to 3D Printing class – Ian who had found us through an Internet search, was interested in makerspaces & signed up for the class. Since he hadn’t seen the makerspace before, gave him a tour afterwards. When showing him our desktop CNC machine, discussed how it was possible to do a printed circuit boards (PCB) but we hadn’t yet tried it. His eyes lit up as he mentioned creating some circuit boards that were sent away to get made. It wasn’t hard to quickly come up with a project.
With a lot of micro:bit work at Castlemakers because of the Putnam County Microcomputer Initiative (PCMI) lately, creating a micro:bit accessory board seemed like a great choice. At our model rocket class in August we tried to launch a micro:bit board to measure acceleration, but the lack of a small battery & SD card prevented it.
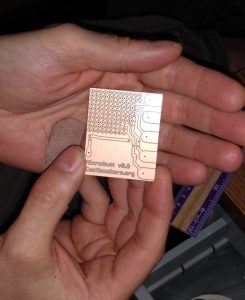
After talking through the features wanted on a board, Ian quickly did a PCB design that became our first test of using the desktop CNC to make an electronic component circuit board. It machined great, but we also learned there had been some assumptions and spacing errors we hadn’t thought of. That’s when DIY makerspace mentality paid off – instead of waiting 10-12 days for another firm to make a new circuit board, after the design change we made the new design in less than 15 minutes! The desktop CNC is really a great tool for testing and making prototypes.