Category Archives: 3D Printing

Upgrading 3D Printers

One of the makerspace areas upgraded during the pandemic was 3D printing. There’s been several printer upgrades and we even added a new liquid resin printer to the makerspace.

Rewiring a Rostock Max 3D printer
Ian works on the Rostock Max 3D printer wiring.

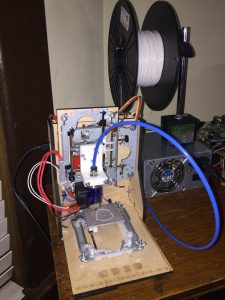
The most significant change has been to our delta 3D printer, upgrading our Rostock Max from v3 to v3.2. That included 3 major upgrades; a new printer controller board, upgrading the stepper motors, and a new hot end.

The controller board change went from an Arduino-based RAMBo v1.3, an 8 bit control board, to a newer 32 bit Duet WiFi board for the printer ‘brain’. The RAMBo board is certainly a good one, we’ll probably use it to build another 3D printer, but the Duet has major improvements in both usability and speed. The Duet is also WiFi remote controlled and since the control board is located internally, the former LCD panel and SD card was removal. We recently bought a PanelDue, so there will be a new touch screen control available soon when we make that upgrade next.

New Duet 3D printer controller board installed.

We also changed the 1.5 degree to .9 degree stepper motors. Combined with the Duet control board this reduces the printer noise level dramatically and improves printer quality/speed with the micro-stepping addition. A new hot end assembly also improves the bed leveling sensitivity and heating capability. Bed leveling and the ability to print higher temp materials are a nice improvement for this machine!

There’s been other improvements in makerspace 3D printers, including the Printrbot Metal Simple & an older now modified XYZ printer. We’re in process of setting up a workspace for a MoonRay S100 SLA/DLP 3D printer & will write up more about that in a future post. Come to one of our 3DPO (3D Printer Owner’s) meetups, the next one is 12/30 at 6:30 pm. Or stop by Castlemakers to learn more!

Window Micros

Web accessible lamp with ping pong balls for LED diffusion.
LED lamp at Castlemakers in Rainbow mode, the colors change continuously in this video.

Pointing out the new ping pong ball lamp in the Castlemakers window on Franklin Street is a natural follow-up after writing last month about the micro:bit in the window. It’s a great fun, low cost project built by one of our member with items found at the makerspace, except for the ping pong balls.

Example lamp components, penny included for size comparison to the ESP8266 modules.

Recently several of us started experimenting with ESP32’s, a ‘system on a chip’ device that’s less than $10. I’m working on a squirrel proof bird feeder using an ESP32 with a camera for squirrel recognition, more on that later. This project is built however with an ESP8266 module, predecessor of the ESP32, which cost even less. The ESP8266 modules, bought some time ago for $4, are still quite capable having both wifi and a control channel built in. Ian, who’s known to build things for the heck of it, turned an ESP8266, a bit of leftover led strip lights, some 3D printing, ping pong balls and some glue into a flashy user controlled lamp!

Webpage for lamp controls if you’re logged into our network.

There was mathematics involved in figuring out the right way to spiral the LED strip up the side for tight ping pong ball spacing, which depends on the diameter of the 3D printed cylinder. What’s also impressive is the built in web server. If you’re at the makerspace and logged into our network, type http://pingpong1.local to change the lamp pattern. Pretty darn impressive for a $4 circuit board!

We’re thinking about creating a class to help folks build these. If you’re interested stop by to let us know, post on this blog or send us an email.

3D Printing with Scrap

CD3D 3D Printer made with scrap parts
Ian’s new 3D printer made with scrap parts.

One of our more prolific makers, Ian Girvan, recently created a 3D printer using mostly scrap parts found at home and at Castlemakers. It’s impressive, using old computer CD-ROM and DVD drives for their stepper motors and mechanisms along with a second hand computer power supply.

What a great way to learn about 3D printers, brings to mind how the first consumer level 3D printers were created in the early days of the RepRap movement. I’ve been watching in awe the last few months as he figured out how to make the old parts work, only buying a very few new items like the hot end. He’s detailed some of his work for us on this webpage, it’s definitely worth a look!

Edge Lit with micro:bit

We’ve still had projects at Castlemakers this summer, even with the Covid shutdown hampering our hands-on education efforts. One that I’m excited/impressed with is a high school student built project that includes programming, electronics, 3D printing and using a laser cutter – all made with items at the Makerspace!

Programming the micro:bit to control the LED light strip using MakeCode, a block based programming language.

Ever since we gave every 6th grader in Putnam County a micro:bit last year, we’ve wanted to do more micro:bit projects to help youth and adults see the power of microprocessors and IoT devices. And to get a chance to expose and use some of the some different fabrication tools often found in a makerspace. This summer Hunter Miller made a really interesting project, an edge lit sign controlled by a micro:bit. It looks a bit like an emergency exit sign with a disco like effect and instead our logo on it.

The design and case was modified from something created at the Cambridge UK makerspace, who was looking to create something to experience the different makerspace tools. We used our 50W CO2 laser to cut and etch an insert for a 3D printed case that with led lighting on the edge makes our logo stand out. Hunter, who was looking for something else to do this summer, then cut a section of a 2m LED strip and after some soldering connected the wires directly to a micro:bit. Then he wrote a micro:bit program using MakeCode that makes the LED strip change color and intensity.

Color scrolling mode using addressable LED strip controlled by a micro:bit.

It’s on display right now in our front window on Franklin St. Stop by and take a look or come in and we’ll show you how it works – the different lighting modes may have you dancing!

Makers & Covid

Castlemakers window display of covid-19 projects on Franklin street.
Face shields and a 3D printed mask made at the makerspace.

Our blog posts have been running behind lately, but we’ve been busy the last few months. We’ll update with some older entries since like many folks we’ve had more ‘stay at home’ time with the COVID-19 mess that’s been going on.

Even though we’ve stopped having public events since mid-March, there have been things going on inside (using recommended guidelines). Our main 3D delta printer has never been worked so hard in such a short time since we got it 3 years ago.

The picture to the right has some examples of what’s been made there to help first responders and others with the COVID-19 battle. We can’t make things in large quantities, but we can fabricate and adjust quickly – plus worldwide the makerspace community has rapidly stepped up to help people where they can. Longer term existing manufacturers will and are already starting to fill the gap, but it sometimes helps to do locally what can be done until the gap is eliminated. We’ve got a special webpage with some local covid making projects in Putnam County and more details about how the face shields, face masks, and ear savers can be made.

Greencastle First Friday Events

With this month's Laua theme we had a palm tree & create-your-own Tiki head out front.
First Friday project to color/create a Tiki head out in front of Castlemakers.

Our downtown location gives us a great opportunity each month to participate in Main Street Greencastle’s First Friday. Each month we not only have ‘open shop’ to share what’s going on inside the Makerspace, but also try to have some themed making events that folks can see / participate in.

This month Main Street was promoting a luau theme – so making a carpet tube palm tree and some Tiki heads were naturals. The Moai head printed on our Rostock Max 3D printer inside was so big that it took nearly 11 hours to finish; although started at noon I’m fairly sure no one else saw the finished print Friday night.

Moai Head printed on delta 3D printer.
Moai head print that is over 35 cm (14″) tall.

Then there was the ukulele playing Lego Mindstorm robot that Jacob built for the event. Thanks to Putnam County 4H we’ve had some EV3 robotic kits on loan for a while, using them in our CoderDojo, projects like our PuttCode, and getting kids & adults interested in robotics.

Thanks to Jacob & the rest of the Hale family for helping out – not only the things they made but with running this great family oriented monthly event.

2019 Midwest RepRap Festival

MRRF2019-tables
A lot of folks don’t realize that world’s largest 3D printing meetup is held right here in Indiana. This year several of us went to the 2019 Midwest RepRap Festival (MRRF) in Goshen Indiana – and it exceeded expectations. It was impressive in a number of different ways, from the 3D printing ‘names’ and prototypes that were there to the number of innovative ideas that people were trying and showing off. You could describe it as a Maker Faire just focused on 3D printing.

MRRF2019-spireThis is not a Midwestern or even just a USA event. I talked with firms from Britain, China, Czech Republic, Israel, and I’m sure other places I don’t remember. You could learn about products directly from the manufacturers present, then walk over a couple of aisles to someone that was using their parts in a 3D printer they had built.

Folks spent most of the day gluing this massive 3D printed light up alien.

And the really exciting part was being able to network with all of the interesting people and the things they brought. From a school built/designed concrete printer to a home-built printer designed to print outdoor 4-5’ tall artistic spires (which lit up from internal LEDs), innovation was everywhere with tables of folks showing off what they had made. Filament mixers to create multicolor prints? Stopped counting, too many. Continuous 3D printing on a belt? There & being open-sourced. Even someone rebuilding 3D printers & shipping them to underdeveloped countries.

It was actually hard to get around, between the massive crowd and number of Youtubers that were there making segments for their online channels. Sure many printers & prints were complex and daunting. But there were also tons of simple ideas like an enclosed 3D printer case using a food dehydrator to keep things warm & humidity low.

3D printed R/C car racing was held next to the "Livestock Potty Area" at the 4H Fairgrounds.
3D printed R/C car racing was held next to the “Livestock Potty Area” at the 4H Fairgrounds.

Definitely won’t miss next year & started planning our table for the annual event. We’re discussing 3D printed R/C cars for the race & perhaps Rob will bring out one of his 3D printer designs for next year…

Photogrammetry and 3D Printing

roman lamp made using photogrammetry
Image of a Roman lamp unearthed this summer in Italy created from photos & then 3D printed.

Castlemakers offered our first class on photogrammetry, or using photographs to create 3D objects, in October. But the more interesting story to me was how we got there. It began just before our Intro to 3D Printing class last spring, when a couple of folks wanted to learn about 3D printing so they could hopefully print things from an archeological dig in Italy in the summer. While I had experimented some with earlier software, this was mostly new territory.

Italian dig site near Umbria being printed. Pillars are the flooring in a Roman bath house.

But Rebecca, one of the students in the class, took it to another level. She was able to get a copy of a professional program, Agisoft, then take pictures at a Roman dig site in Italy this last summer. Using the program, she generated 3D images of artifacts they found and even took photos of the excavation at the site (a Roman bath house) which she was able to turn into a 3D image. When she got back in August, in a little over a week she was able to 3D print not only artifacts but also make a model of the dig site using the 3D printers at Castlemakers.

As we prepared for the Castlemakers class to show others how to do it, we discovered what may be an even better solution – a program called 3D Zephyr. We decided to cover both, especially since 3D Zephyr has a way of extracting photos from video to make the 3D image – a pretty amazing feature! The experiments will continue with local landmarks and we’ll be doing the class again this spring.

It’s Not Rocket Science

First stage of the model rocket that Nick launched in the fall of 2016.

If you walked by the Makerspace this summer and looked in the window, you may have noticed a very large model rocket. It was the first stage of a creation that Nick Adams, who taught our ‘build a model rocket’ class, built last year and launched. Several people have stuck their head in since it left and asked us where the rocket went. The short answer is he prepping it for an even higher/faster launch this Labor Day weekend in Kansas.

Earlier this year Nick asked if we could make something that would plug the air intake holes, the kind of project we love! When you go supersonic a flat surfaces creates even more turbulence, so for his upcoming flight he wanted a more streamlined version. Plugging 4 intake holes on the side of the rocket would help.

Different versions of the intake plugs.

We initially fabricated a plug out of foam, using a hot wire cutter at the Makerspace, then scanned the piece so it could be 3D printed. Creating the styrofoam piece was easy, scanning… well the Makerbot Replicator we have wasn’t quite up to the task initially. Learned that covering the foam with masking tape helps (the foam color and irregular surface created problems), but it was still less than a satisfactory design.

Nick's QCC rockets assembled, the one on the left has black intake plugs installed.
Nick’s QCC rockets assembled, the one on the left has black intake plugs installed.

Then one of our younger makers, Ephraim, helped by creating by creating a quick model in Autodesk’s Inventor. That design came closer, but we missed measuring a few key dimensions like the chamfer where the plug goes into the rocket. We finally ended up redrawing with Fusion 360, which turned out to be the best solution. Although the program has a steep learning curve, it allowed us to make several more design changes quickly & easily to get the 4 pieces printed out last month.

This weekend Nick’s letting Castlemakers take the rocket to show off at Makevention in Bloomington, Indiana – an annual celebration of making things. Located at the Monroe County Convention Center, it’s open to the public and a great event! Stop by and see the assembled 12.5 foot tall rocket and also stay tuned to Nick’s YouTube channel. I’m sure he’ll have a video of the launch posted not long after the launch on August 30th!

Castlemakers July Class

Chris and his brother add the battery leads to their LED Chaser (think Cylon moving eyes).
Chris and Cameron add the battery leads to their LED Chaser (think Cylon moving eyes).

One of our main goals as a non-profit is providing educational opportunities to the community. Like our Learning to Solder class in May and our upcoming Introduction to 3D Printing Design July 8th (2-4 pm at the makerspace).

In May participants built an LED Chaser (or Larson Scanner), to get first hand experience soldering electronic components, LEDs, and an integrated circuit on a circuit board. Thanks to George Edenfield of Putnam County Auxiliary Communications (local Amateur Radio group) for leading the class.

For the Intro to 3D Printing Design class, we did a prototype class last December when we had kids design & print holiday ornaments. Everyone had fun and we learned that too many people trying to print 3D parts at once can take a long time! We’ve added 2 more 3D printers in the makerspace, more laptops, and changed to a quickly printing basic design that offers more learning.

Demo ring for our upcoming class, other orientations will be used also!
Demo ring for our class,  but decoration can be reoriented…

In the upcoming class (for both old and young) you’ll be designing a custom ring to fit your finger and adding an adornment on top. It’s a great way to learn the basics in Tinkercad and prints in 4-5 minutes per ring depending how elaborate you get. Special thanks to the Maker Lab at Chicago Public Library for the idea – like almost all makerspaces they willingly exchange information and share ideas to help the maker movement!