The Value of Prototyping

Power vs Speed grid to determine proper levels for the desired depth & darkness in black walnut wood.

One of our members wanted to make a commemorative plaque for his church using the CNC and laser engraver at Castlemakers. I volunteered to help, thought it would be a good chance to use our bigger CNC with some newly updated software and we could both learn in the process.

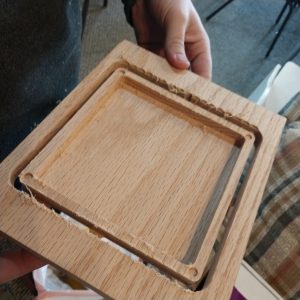
CNC plaque cutout with the first prototyped laser engraving.
First engraved prototype in plywood next to a full thickness pine cut out on our CNC.

Given the nice wood they wanted to use, doing several prototypes with lower cost wood seemed in order. It also would give him something to show the church committee approving the plaque. Ed was able to locally source some rough cut black walnut wood and another member Ian used his planer so the wood could be glued to an appropriate width.

In the meantime one of the other church members created a great looking design for the engraving. For the first prototype, done in birch plywood, we just used the laser to cutting the shape to show others for approval. This resulted in a few minor changes and a decision by the group to add gilding to part of the dove and the rays on the plaque.

Black walnut test gilding before changes.

The final plaque is on darker wood, so we engraved a sample portion on some scrap black walnut and it’s a good thing we did! The original rays were too thin, making gilding extremely difficult. Now with the final design was completed, another prototype was made in pine the thickness of the final plaque to make sure the CNC portion of the project was going to work with the engraving.

Pictures by Radio

An amateur radio mode called Slow Scan TV (SSTV), given the speed of transmission, is really more about sending pictures than sending video. I’m guessing the name came from it’s similarity to how television video used to work.

SSTV picture of Castlemakers received using an app & ham radio.

I’ve used slow scan to receive images transmitted from the International Space Station as it passes overhead, which has been covered in a previous blog posting. At that time we recorded the transmitted ‘image’ using a voice recording app on a cell phone, emailed the image to a computer, and then used MMSTV to turn the recorded sound into an image. A more permanent/perhaps better setup would be using an interfacing cable to connect the radio directly to a PC with sound input.

Several months ago Ian stumbled across a simple phone app that decodes SSTV images, Robot36. It decodes the image directly on your phone, using the cell phone mic as input. After discovering a similar SSTV encoding app, SSTV Encoder, we realized we could send images directly to each other using our handheld amateur radios.

Closeup of our sign at night using a handheld radio to transmit the picture wirelessly.

Of course you should be able to use this setup with walkie talkies, FRS or even GMRS radios. We’ve used it over our local amateur radio repeater for even longer distances, and planning a demo with some of the other local amateur radio operators probably during Field Day in June.

We’ve started a webpage that explains SSTV and some of the software you can use to view it in more detail if you’re interested in trying it/learning more!

Squirrel Proof Birdfeeder Testing

One of the longer term projects I’ve been working on at the makerspace is a squirrel proof birdfeeder that uses machine learning to identify squirrels vs birds, then make a noise when those darn squirrels try to get a snack in the birdfeeder!

Squirrel proof bird feeder made using acrylic and 3D printed parts.
Bird feeder without the onboard ESP32-EYE camera housing, which will be mounted on the right side.

The project goes back a few years when I stumbled across a Google project to make a design using a Coral development board to accomplish the same thing. Since we had the equipment to make most of the components at the makerspace, except the development board, I started making one and looking into improving their idea.

First minor change was an error in the CAD files, which I’ve corrected on my GitHub. It also seemed like the board they chose was overkill, I had wondered about using a Raspberry Pi, but then Brian pointed out it might need a board with a better GPU. Ian mentioned the ESP32 board/chip could run TensorFlow Lite & might do the job. Cost of the ESP32 boards was appealing, so I started going down that path even though I didn’t know much about the subject at the time!

Squirrel Proof Bird Feeder test picture
ESP32-EYE image from the bird feeder. The onboard facial recognition software generated the yellow box.

I made was the birdfeeder housing and seed holder well over a year ago, which turned out quite nice. But the ESP-EYE housing got complicated between mounting locations, how to power the device, how to create the noise and lots of other distractions, so it got put aside a while ago until I could get back to it. Earlier this month, with some help from a student working at the makerspace, I started working on it again creating a prototype housing for the ESP-EYE v2.1 board in Fusion360 and restarting the work on the software.

It’s now at the point where it’s taking pictures and we’ve begun training the software to identify squirrels (cat pictures work pretty well). It still needs more work, and I’ve gotten other projects that need finishing first. But I’ll put a page on our website when more details are finished. Or stop by our makerspace & we can show you the progress in person!

Reflections on 2023

As a nonprofit organization we elect our board & officers during January and use the annual meeting to look back to help with planning going forward. The pandemic hit us hard like many organizations that rely on volunteers, people, and contact with others. Even with our conservative nature and financial reserves it was a challenge; we made it through but the aftereffects continued throughout 2022. And like everyone else utility and other costs went up significantly. Sometimes as much as 20%, which is difficult for a small all-volunteer nonprofit. After some downsizing and cutbacks however, by the middle of 2023 it appears we turned the corner – and since seeing more interest, donations, and volunteer activity.

While members help cover our costs, donations from other organizations are critical also. Walmart Foundation‘s Local Community Grants have really made a difference in letting us continue our program efforts – many people don’t realize how Walmart through their foundation helps many local nonprofits. We’ve also received in the last 2 years a grant from Buzzi Unicem and were a Darrell Wiatt Family Philanthropy Essay Contest recipient through the PCCF – both greatly appreciated.

Individual private donors have also made a difference, we’ve listed many of those on our contributors webpage. You can also help – stop by during our Open Shop hours and ask to learn more, or you can donate directly through our website, or help out by volunteering with our organization!

Laser Etching Glass

Glass fusing and slumping equipment
Newly donated glass fusing and slumping equipment.

It started right after some donated glass fusing and slumping equipment, more on that in a future post, that was dropped off at Castlemakers. Troy, one of our more creative members, came in during open shop night with a sheet of glass and asked what our laser engraver/cutter would do to it. Since I wasn’t sure, it seemed like the perfect opportunity to find out.

Etching glass with our CO2 laser.

As it turns out it, it works great for etching! Power settings were modest and it gives a nice frosted look to the glass in a single pass.

Cutting really didn’t work though. We weren’t totally surprised that cutting would be more difficult, so started experimenting with the settings.

With wood or acrylic you can make multiple passes that will continue to cut through the material. A slower process, and sometimes takes refocusing the beam, but you can get the job done.

CO2 Laser Cutting Glass Results

In this case we learned that the glass seems to absorb enough heat that it starts chipping and cracking. Perhaps it was the type of glass we were using, the glass used was a home project leftover. You can see from the picture it was not a clean cut and eventually created a longer crack in the glass. For now we’ll just manually cut glass until we get the new diamond saw setup. But we did learn how to etch using the laser!

Halloween Making at PCPL

For the last several years we’ve been helping out at the Putnam County Public Library (PCPL) with their Scary Science event on Halloween. It always draws a crowd and love making things for the event.

A trick or treater tries on the animated eye mask we made for Halloween.

We usually bring one of our 3D printers to make something there and this year we printed out a mask for an artificial animated eye. And while not original, we made a ghost for a robotic vacuum that was often seen wandering around the library’s lower level cleaning up things.

Topping off our tricks was an updated version of Pepper’s Ghost, an optical illusion that makes animated things appear to be floating, using a tablet and a prism created on our laser cutter. We already have some ideas for next year’s event!

2023 Putt Putnam County

You could start the course by the downtown square.

The First Friday in October is always one of my favorites because of our annual mini-golf hole tournament in downtown Greencastle. We had a record number of holes again this year, with 14 mini-golf holes lined down Franklin Street.

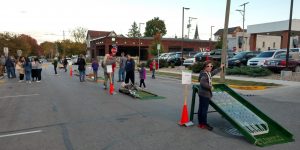
Maker Challenge mini-golf hole at Putt Putnam County 2023
Maker Challenge had 3D printed obstacles.

With so many choices it’s always hard to pick a favorite, plus a few of the most popular mini-golf holes from previous years reappeared. Putnam County Public Library‘s new entry was popular, along with the Halloween themed hole that had a skeleton with light up eyes. Walk in the Park was a new themed hole based on input from Putnam County youth that stopped by our September First Friday project. And the Maker Challenge hole was updated this year to literally include a green castle!

2023 Putt Putnam County Virtual mini-golf hole.
The golf ball traveled through downtown Greencastle.

A personal favorite was the ‘virtual’ mini-golf hole where you hit a physical golf ball that then appeared on a Google map of downtown Greencastle displayed on a TV screen. The hole even had an easter egg where a hole-in-one on the first 2 screens would let you try your hand at navigating the one way streets and road construction in downtown Greencastle. Look for this hole to be back in the 2024 Putt Putnam County event… with a new virtual course and of course more construction obstacles!!

By the end of the evening the skies were clearing for the players on the course.

Resin 3D Printing

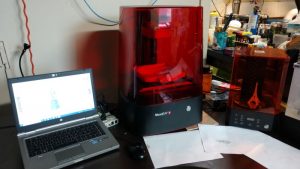
Last year we had a Stereolithography (SLA) 3D printer donated to the makerspace and finally made time to get it up and running. The makerspace has been using using fused filament fabrication (FFF or FDM) since we moved into the physical makerspace and myself longer than that, but have resisted making the leap to other forms until now.

Resin 3D printing workstation at Castlemakers.
Our Resin 3D Printing workstation

SLA so far has been pretty much what I expected: really great resolution and detail but it’s more complex dealing with the uncured resin. Post-processing time and especially cleanup is more involved than FFF, so processing 3D prints in batches makes a lot of sense. We haven’t experimented much with different resins, cost of the resin feels like it it is much more than FFF printing, although it’s a difficult comparison since SLA prints use a lot less resin and the uncured resin can be reused if you’re careful.

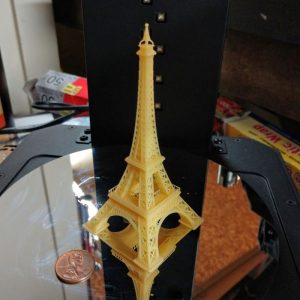
Resin printed Eiffel tower at Castlemakers
Eiffel Tower Printed at 50 microns

But oh, what resolution compared to FFF printing! You’re hard pressed to see the height layer lines when printing at 50 microns (yes, that’s .05 mm or .002″) and ours will let us print at 20 microns if you’re willing to take the time. X and Y dimensional resolution is at 75 microns (.075 mm/.03″), which is something you’re not going to see coming out of a filament nozzle printer. Of course for those levels of detail it will take longer to print, although the Digital Light Processing (DLP) system helps make the individual layer printing time much shorter.

There’s some other minor differences, like the way you have to think about supports since the prints are pulled out upside down out of the resin tank. But it’s a nice tool and addition to the makerspace. Stop by sometime & we can show you what we’ve printed. We always have a class in November or December for folks to learn about 3D printing by making holiday ornaments, watch our events webpage or sign up for our newsletter to find out that date and more.
Sometimes it takes a pro…

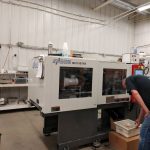
SeeMeCNC injection molding machine
One of the injection molding machines making printer and other parts at SeeMeCNC.

While makerspace folks are all about hacking things, sometimes it’s useful to get someone who makes them for a living involved. Our Rostock 3D printer was an early purchase and with some recent intermittent problems occurring and wanting to do some upgrades, we decided to take it back to the factory in northern Indiana where we bought the kit in 2016 for a tune-up. Besides, we figured it would be a great chance to see some of the latest improvements in 3D printing with a Delta!

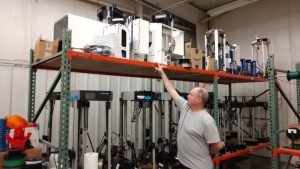
Museum of Printers at SeeMeCNC
Steve shows off some previous 3D printer designs.

We scheduled some time with Steve Wygant at SeeMeCNC in Ligonier IN to look over the makerspace upgraded Rostock Max V3.2 to see if he had some clues about the intermittent problems we were starting to see. If you’ve printed a lot, especially in an environment with multiple people using the machine, you can understand why it’s important to have a 3D printer that just prints. And one where you don’t have to keep tweaking settings to get things printed correctly.

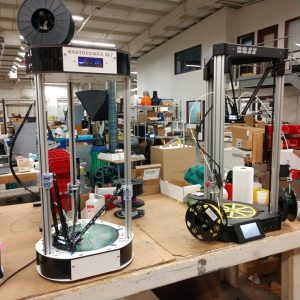
Castlemakers Rostockmax V3.2 next to a BOSSdelta printer at SeeMeCNC
Testing our Rostock printer at SeeMeCNC next to their latest BOSSdelta.

One of the first things we learned: all SD cards are created equal. Ours ended up with a generic card in our Duet controller. Steve had a stack of bad used cards pulled from troubleshooting other printers. After upgrading the Duet firmware to the latest SeeMeCNC configuration, we also installed a PanelDue – an upgrade we’ve wanted to do for a while.

A hotend replacement with an improved connector and resetting the Cura settings/configuration finished the job. And after a month of trouble-free and much improved printing quality, I can truly say the time & trip up there was worth it. It’s really nice to have a printer with online guides and the support behind it to keep it running for over 6 years, plus it still makes prints that people are impressed with. And not having to pitch & buy a new printer when it wears or something goes wrong!

Summer First Fridays

Sometimes a simple design is all it takes…

Greencastle’s First Friday’s have become one of our favorites that we look forward to at Castlemakers. It’s become a tradition for us to have a youth-oriented hands-on project on Franklin Street during the event, plus we get to show off projects going on inside the makerspace for anyone interested.

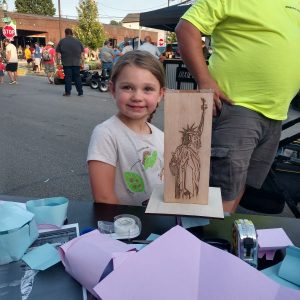
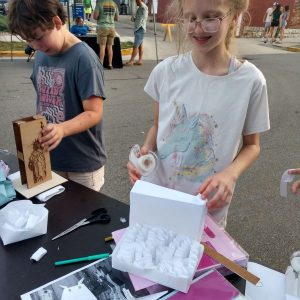
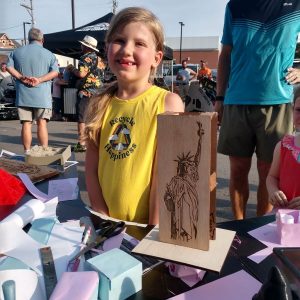
For this month’s creative challenge we chose a 4th of July themed project, challenging people to build a base out of red, white, & blue copy paper with tape to support a Statue of Liberty. The Statue of Liberty was made using our laser engraver/cutter and had a lead weight inside to make it a little more challenging. And photos of the real thing were there to help folks come up with ideas.

More Statue of Liberty base building ideas.
Experimentation & creativity in building was abundant!
Another successful base built!

There were some really creative solutions generated by youth building the base – definitely some signs of potential future engineers. I was expecting to see a few discover and use the edges of the paper since they can add more height than the flat portion. I wasn’t expecting so many different creative ways they would that concept. We even had one young woman create a box, then fold strips of paper inside to provide a very strong, yet clean outside base that looked great!

Our next upcoming First Friday event is Friday August 4th from 6-8:30 pm on Franklin Street. And of course you won’t want to miss our annual Putt Putnam County, where we take over Franklin Street to show off community build mini-golf holes for everyone to play on a Friday night.

The ‘who could build the tallest’ competition went on for quite a while…
This one definitely got the job done.
One of our first entries.

Greencastle Indiana's Makerspace!